The Creamware Arpeg01 lessons!
This article originally appeared in the Creamware Forum on
www.planetz.com
You can view the original thread by clicking here
In this article I will explain how to use the pulsar arpeg01 together with your sequencer, in order to have a deeper control of your arpeggiator sequences, edit and store them. This article come with a zip file with the examlpes provided.
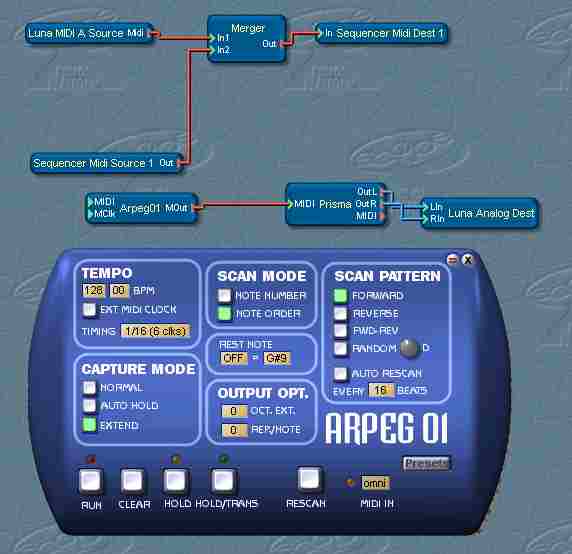
Let's begin to create our basic project: I have loaded the arpeg01 together with the prisma, connected the arpeg01 to the seq midi source and your masterkeyboard to the seq midi dest
Load the preset "veloci sequencer" in the prisma and tweak it little by setting the filter cutoff to zero and the filter envelope knob to the maximum: in this way you can open or close the filter by acting on the note velocity, and this will be useful for a better understanding of how the arpeggiator works (and for getting best arpeggiator sequences, according to me!)
The basic arpeggiator use would be just play a chord on your keyboard and let the arpeg01 arpeggiate the chord you are playing. this use of the arpeg01 is detailed in the SFP manual, so i'm not going to rewrite it in this article. Here i want to stress on how you can use the arpeg01 along with your sequencer (i use Sonar 2.2 piano roll, but the concepts are the same on every sequncer!!)
First of all, if you have a sustain pedal, you can assign the "clear" button to the midi CC64 of you pedal, so that you can "clear" the current sequence stored in the arpeg01 just by pressing once the pedal: this is very nice!
Let's begin from the arpeg01: toggle it to "off" by clicking the "run" button.
now set the following parameters in the arpeg01:
a tempo you like (i left the default 128)
the "scan
pattern" to "forward"
the "scan mode" to
"note order"
the rest note to "off"
the
"output option" -> "oct ext" and "rep
note" to 0
you can tweak these last two setting later to
achieve different results from your sequences.
Now that the arpeg01 is off, you can play your keyboard normally.
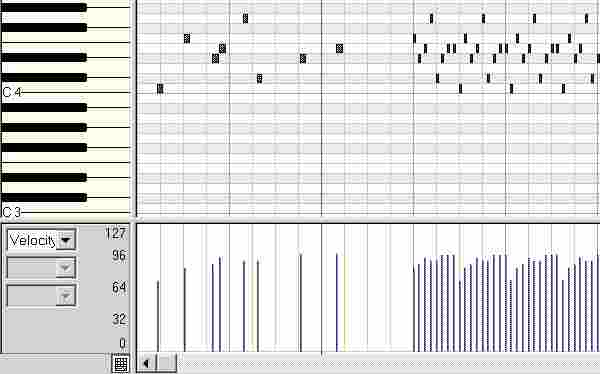
Switch to sonar piano roll and begin by drawing some notes, like you see in the picture.
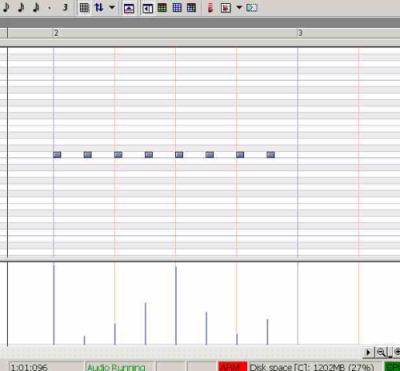
If you don't want odd meters, write multiples of 4 notes (4,8 or 16). I began with a very simple series of C4 notes with different velocities (you can see the midi file - c4 pattern.mid). keep in mind that, since you are controlling filter with velocity, the high velocity will give the accents to the patterns, and the very low velocity notes will act as "rest notes" (this of course depend on the patch you are playing with!).
While you are drawing the sequence in the piano roll, the tempo of your project doesn't matter, because the output will be at the arpeg01 tempo. but you can match the arpeg01 tempo with your sequncer just by setting arpeg01 to "ext midi clock" and by setting your sequencer to output tempo midi events (look at your sequncer manual on how to do this!)
The powerfulness of combining the sequencer with arpeg01 is that now you have full control of the pattern!
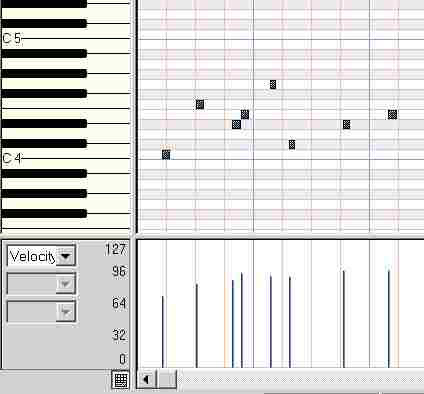
You have drawn the notes, right? turn "on" the arpeg01 and hit "play" on the sequencer: you will listen to the arpeggiated sequence you just wrote!! you don't like it? simply press the clean button (or your sustain pedal!) and arrange in a different way the notes, or modify the velocity! now hit "play" again on the sequencer and listen to the new result! cute, isn't it??
With the arpeg01 on (and the sequence cleared), you can even record a pattern played by the keyboard on your sequencer, and then edit the notes you played.
Arm a midi track, turn the arpeg01 on and press "record" on the sequencer. now begin to play some notes. you will hear the arpeggiated sequence born under your finger... now stop the sequencer, clear the arpeg01 and look at what you recorded: you like it? save the midi file! you don't like it? tweak some note or some velocity and press play on your sequencer again to listen on how the pattern looks like now!
In the "recorded pattern.mid" file i played random notes at random tempo, but is duty of arpeg01 put them in time and build the sequence.
Now the coolest-of-all-part: let's record the sequence we just build on Sonar.
In order to do this, first let arpeg01 play a sequence you like. now you have to make some cabling modifications in the SFP window: disconnect the sequencer midi source from the arpeg01 (this is VERY important!!!) and connect the arpeg01 midi out to the sequencer midi dest. if you don't disconnect the arpeg01 form the sequencer midi source you will have feedback events and maybe crashing of your system (it really happened to me...)
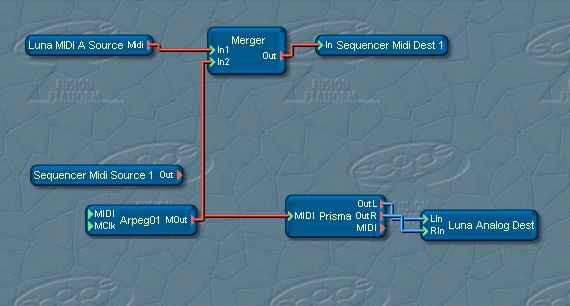
Arm a midi track and press "record" on the sequencer (while the arpeg01 is still playing). Sonar is now recording the entire arpeggiated sequence: you can record some bars and the copy/paste them.
When you have the sequence recorded, turn "off" the arpeg01 by clicking on "run", reconnect the sequencer midi source to the arpeg01 and disconnect its output from the sequencer midi dest.
Now, if you press play on the sequencer, you will listen to the exact copy of the pattern produced by the arpeg01, and you don't need the device in your project anymore! You can now store this sequence as a midi file, tweak some note, rearrange it, and so on.
In the file "stored pattern.mid" I first recorded the notes from the keyboard, in orded to generate the arpeggiated sequence (this is the same as recorded pattern.mid"), then there is the output sequence from the arpeg01.
You
don't see frames?
Click here!