Gigasampler Tutorial: Lesson 1
Tascam
Gigastudio home
In this first lesson I will introduce the several sections of the Editor interface and we will learn the basics for the creation of a simple and at the same time complex gig instrument.
This lesson is like a small tutorial: the explanations on "because" we do something are reduced to the minimum, and will be explained better later. It is possible to download the samples used in this tutorial, and as it is also possible to download the gigs created and a small demo for Cakewalk. All these are included in the ZIP file link at the end of this lesson.
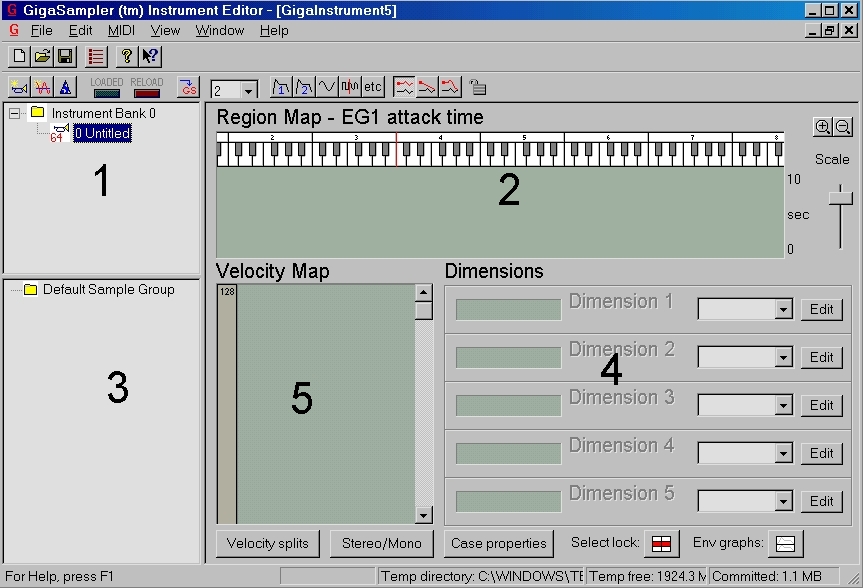
We will explain the main concepts, as the meaning of "region" and "dimension". Figure 1 shows the instrument editor just opened and after have chosen to create a new instrument (files - new). With reference to the numbers of the previous figure, we will analyze the various sections and we will follow the fundamental passages for the creation of a bank. 1) A gig file can contain various instruments (like a soundfont) and we can switch between instruments with a program change message. In the current version it is not possible to import instruments from different gig files, as they must be created all inside a single file. Clicking with the right mouse button on the instrument name (in our case "untitled") it is possible to give it a name (for example "guitar"); a double click will show the instruments properties, which will be object of a future lesson) Here is reproduced the keyboard, on which we will assign the samples to the several notes. For now it is empty but with a right click we can create one new region in correspondence of a note (terms note and region will be used as synonyms). We can create how many regions we want: to each of them they could be assigned one or different samples, and they will be played when sequencer or the masterkeyboard will play the correspondent note.
As soon as created, the region occupies the extension of a single note (C4, correspondent to middle C). The management of the regions, of their position on the keyboard and of their extension, is very simple: to move a region from a note to one another (for example, after have created the region in correspondence of C4 we want to move it in correspondence of C3) we havo to put the cursor at the center of the region and drag it where we want, to the right or to the left. An help in this operations comes from the zoom button at the right. We can "slide" the keyboard to right or to the left in order to reach zones outside of the visible one by moving the mouse on the keyboard itself (it will appear a small hand) and dragging it to the right or to the left holding left button. Every region can also be expanded in order to cover an interval of different notes, moving at its edges and dragging it towards right or left. When a region occupies a space of more notes, as an example from C3 to C4, it will come played the same sample at the pressure of a whichever key from C3 to C4 and the sample will come automatically tuned to the correspondent note. With the right key, we can delete a region or open the properties windows, that shows which interval occupies the region in examination. In this version of Gigasampler the options "self-exclusive" and "key group" do not have effect.
Using the concepts exposed here, you should have no problems in creating 4 regions, each with an the extension of one note, and assigning them to the notes E3, F3, F#3, G3. 3) the window is called "wave pool", and here we import the samples with which we will create the instruments. With right button we have various options: we can import single samples, entire directory and organize the samples imported in folders. With "new empty group" option it will be created a new folder in which we can import samples. It is a very important to organize the several samples in an intelligent way.
First, having as an example a chromatic sampling (that is note by note) of an instrument, it is opportune to name the samples inserting in filename the English name of the note to which they refer (as an example: guitcleanE2, guitcleanF2, guitcleanF#2...) we will later on see the importance of this nomenclature. Then, we will have to separate in opportune folders samples that refer to different characteristics of the instrument: as an example we will create one folder for "guitar clean", one for "guitar distorted", one for "guitar power chord", and one for "guitar palm muted". The relative samples will be imported in each of these folders. But before importing the samples, we have to go in the Edit - Preferences and select the option "guess form filename". The window wave pool works like the Windows explorer: you can rename the samples with left key, move samples from one the folder to another, etc. 4) In this section (called Dimension) we define the "dimensions" of the region selected in section 2. In order to select a region we havo to click on it once with the left key, and we will see it yellow. We can select more regions holding CTRL key and left click on the various regions. In order to select more contiguous regions we can hold left key OUTSIDE the regions (in the grey zone under the keyboard) and "draw" a rectangle that comprises the interested regions. In this way it is easy to select different regions at the same time.
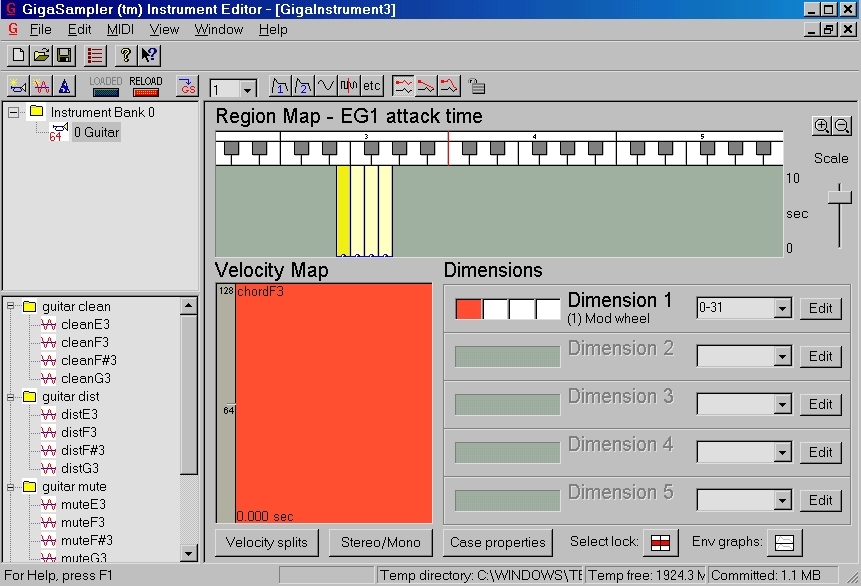
Now press the key "edit" near the dimension 1, opening the corresponding menů. This is the "heart" of a gig instrument, and will come examined in detail in the next lessons. For now, select "control source (1) Mod wheel", press the key "apply to all selected regions" and select "2 bits (4 splits)". Like said previously, we will later explain the meaning of the several options. Once pressed OK we return to the main program view, and notice the presence of 4 cases (4 splits). It is very important begin to understand the concept: each of these 4 cases correspond to dimension of our note (correspondent to the evidenced zone of yellow in the section 1) and to each of these cases we can assign different sample, independently. We will return however on the issue in the next lessons. 5) This section shows the samples assigned to a note, in relation to the case selected in section 4 (remember that to various case they can correspond different samples). The section takes the name of "velocity map". Having followed all the indications given, the editor window should be like the one shown in figure 2. In it we see also the several samples in the several folders. We can now assign the groups of samples in the wave pool to the regions. In order to do this, we have to select in section 2 all the regions (they should be all yellow) and then select the first case on the left in region 4 (in the small window near "Dimension 1" should be written 0-31).
Now drag the folder "guitar clean" (by clicking on the folder name, not on single samples!) in the red zone of section 5, the one under the written "velocity map" (this zone is called "velocity map"). Selected the second case from left in region 4 (near "Dimension 1" should appear 32-63) and drag the folder "guitar distorted" in the velocity map. Repeat the operation selecting the third case in section 4 and dragging in velocity map the folder "guitar mute" and, last, select the fourth case and drag "guitar power chord". Notice that every time you selecte a different case, this change the values indicated in the small window to its left. The power of the editor has allowed us to create the instrument in few and simple mouse click: each of the 4 samples present in every folder of the wave pool, and correspondent to the sampling of a note one of the guitar, is automatically assigned to the note correspondent on the keyboard!
We have created our first gig instrument. We'll now see how this instrument can be used, in order to understand the meaning of the operations carried out, on which we will return however in the future lessons. Save the file and load it in the Gigasampler rack. Moving controller 1 (the mod wheel, CC1) to 0, we will be able to play the first four notes of a clean guitar (the samples assigned to the first case, corresponding to mod wheel value from 0 to 31). Moving the modwheel we will listen to distorted samples (that correspond to modwheel 32-63), muted (CC1 form 64 to 95) and power chord (CC1 form 96 to 127). We can switch form one sample to another in real time! Now a little summary: to each region we create it correstponds a note, and at each note in this case corresponds four different samples (the four splits assigned in the dimension window). We can switch form a sample to another simply changing the controller value assigned to the region.
|
fig.1
|
fig.2
|
 |
 |
Files:
lesson 1 demo.wrk (cakewalk
wrk file)
guitar1.gig (1.1MB)
Samples.zip (1MB)
Lesson Index
Continue to lesson 2